準備編:前提確認と環境セットアップ
はじめに
こんにちは!
今回は、オンプレのUbuntuサーバーにKubernetesクラスターを立て、Helm Chartでアプリやツール群を管理していくシリーズの第一回です。
CloudflareでDNS管理をしつつ、GitHubと連携したCI/CDや監視・ログ基盤も作っていきます。
1. 前提条件の確認
| 項目 | 状態・準備済みか? |
|---|---|
| Ubuntuサーバー | オンプレ環境。kubectl・helmインストール済み |
| Docker環境 | きちんと動作している |
| Kubernetesクラスター | 立ち上げ済み(k3s推奨) |
| Cloudflareアカウント | 管理者権限あり。ドメイン操作可能 |
| GitHubアカウント | 作成済み |
2. Kubernetesクラスターの確認
kubectl get nodes
NAME       STATUS   ROLES           AGE    VERSION
david-pc Ready control-plane 196d v1.30.6- クラスターのノードが1台以上「Ready」と表示されていることを確認
- k3sなら
sudo k3s kubectl get nodesでもOK
3. Helmの動作確認
 helm version
version.BuildInfo{Version:"v3.16.3", GitCommit:"cfd07493f46efc9debd9cc1b02a0961186df7fdf", GitTreeState:"clean", GoVersion:"go1.22.7"}
- バージョンが表示されればOK
- まだなら Helm の公式サイトからインストールをどうぞ
1. Argo CD とは?
- Kubernetesに対してGitリポジトリを監視し、設定やアプリを自動で同期するGitOpsツールです。
- 今回はHelm Chartで簡単にインストールし、GitHubのリポジトリと連携していきます。
2. Argo CD インストール準備
名前空間作成(前回済みならスキップ)
kubectl create namespace argocd
namespace/argocd created
3. Helm Chartを使ってArgo CDをインストール
まずは公式Helmリポジトリを追加します。
 helm repo add argo https://argoproj.github.io/argo-helm
"argo" has been added to your repositories

 helm repo update
Hang tight while we grab the latest from your chart repositories...
...Successfully got an update from the "cilium" chart repository
...Successfully got an update from the "argo" chart repository
...Successfully got an update from the "prometheus-community" chart repository
必要ファイルを用意
下記3つのファイルを用意します
.
├── sample-app-deployment.yaml Pod(コンテナの実行単位)を作成・管理する
├── sample-app-ingress.yaml 外部からのHTTP/HTTPSアクセスをクラスター内のサービスへルーティングする
└── sample-app-service.yaml Pod群に対してネットワークのアクセス窓口(サービス)を提供する
#sample-app-deployment.yaml
apiVersion: apps/v1
kind: Deployment
metadata:
  name: sample-app
  namespace: sample-app
spec:
  replicas: 1
  selector:
    matchLabels:
      app: sample-app
  template:
    metadata:
      labels:
        app: sample-app
    spec:
      containers:
      - name: nginx
        image: nginx:latest
        ports:
        - containerPort: 80

##sample-app-ingress.yaml
apiVersion: networking.k8s.io/v1
kind: Ingress
metadata:
  name: sample-app-ingress
  namespace: sample-app
  annotations:
    kubernetes.io/ingress.class: nginx
    cert-manager.io/cluster-issuer: letsencrypt-prod
spec:
  tls:
  - hosts:
    - sample.cosicosilife.com
    secretName: sample-app-tls
  rules:
  - host: sample.cosicosilife.com
    http:
      paths:
      - path: /
        pathType: Prefix
        backend:
          service:
            name: sample-app-service
            port:
              number: 80

###sample-app-service.yaml
apiVersion: v1
kind: Service
metadata:
  name: sample-app-service
  namespace: sample-app
  labels:
    app: sample-app
spec:
  selector:
    app: sample-app  # ← Pod のラベルと一致させること
  ports:
    - protocol: TCP
      port: 80         # Service が受け付けるポート
      targetPort: 80   # Pod 内でアプリが待ち受けているポート
  type: ClusterIP      # Ingress 経由なので内部通信でOK(NodePortにする必要なし)
helm install argocd argo/argo-cd   -n argocd   --set server.service.type=NodePort   --set server.insecure=true   --set server.extraArgs="{--insecure}"

と打鍵

helm upgrade argocd argo/argo-cd   -n argocd   --set server.service.type=NodePort   --set server.insecure=true   --set server.extraArgs="{--insecure}"
Release "argocd" has been upgraded. Happy Helming!
NAME: argocd
LAST DEPLOYED: Sun Jun  1 19:48:46 2025
NAMESPACE: argocd
STATUS: deployed
REVISION: 4
TEST SUITE: None
NOTES:
In order to access the server UI you have the following options:

1. kubectl port-forward service/argocd-server -n argocd 8080:443

    and then open the browser on http://localhost:8080 and accept the certificate

2. enable ingress in the values file `server.ingress.enabled` and either
      - Add the annotation for ssl passthrough: https://argo-cd.readthedocs.io/en/stable/operator-manual/ingress/#option-1-ssl-passthrough
      - Set the `configs.params."server.insecure"` in the values file and terminate SSL at your ingress: https://argo-cd.readthedocs.io/en/stable/operator-manual/ingress/#option-2-multiple-ingress-objects-and-hosts


After reaching the UI the first time you can login with username: admin and the random password generated during the installation. You can find the password by running:

kubectl -n argocd get secret argocd-initial-admin-secret -o jsonpath="{.data.password}" | base64 -d
server.extraArgs="{--insecure}" とすることでARGOCDに証明書の管理を任せないと明示的に指示します

先ほど作成した3つのファイルを適用します
# kubectl apply -f sample-app-deployment.yaml
deployment.apps/argocd created
# kubectl apply -f sample-app-service.yaml
service/argocd created
# kubectl apply -f sample-app-ingress.yaml
ingress.networking.k8s.io/argocd created
成城に適用できていたら、下記のようになります
kubectl get deployments -n argocd
NAME                               READY   UP-TO-DATE   AVAILABLE   AGE
argocd                             1/1     1            1           72s
argocd-applicationset-controller   1/1     1            1           10m
argocd-dex-server                  1/1     1            1           10m
argocd-notifications-controller    1/1     1            1           10m
argocd-redis                       1/1     1            1           10m
argocd-repo-server                 1/1     1            1           10m
argocd-server                      1/1     1            1           10m

#kubectl describe deployment argocd -n argocd
Name:                   argocd
Namespace:              argocd
CreationTimestamp:      Sun, 01 Jun 2025 20:36:15 +0900
Labels:                 <none>
Annotations:            deployment.kubernetes.io/revision: 1
Selector:               app=argocd
Replicas:               1 desired | 1 updated | 1 total | 1 available | 0 unavailable
StrategyType:           RollingUpdate
MinReadySeconds:        0
RollingUpdateStrategy:  25% max unavailable, 25% max surge
Pod Template:
  Labels:  app=argocd
  Containers:
   nginx:
    Image:         nginx:latest
    Port:          80/TCP
    Host Port:     0/TCP
    Environment:   <none>
    Mounts:        <none>
  Volumes:         <none>
  Node-Selectors:  <none>
  Tolerations:     <none>
Conditions:
  Type           Status  Reason
  ----           ------  ------
  Available      True    MinimumReplicasAvailable
  Progressing    True    NewReplicaSetAvailable
OldReplicaSets:  <none>
NewReplicaSet:   argocd-75d7f9dd68 (1/1 replicas created)
Events:
  Type    Reason             Age   From                   Message
  ----    ------             ----  ----                   -------
  Normal  ScalingReplicaSet  112s  deployment-controller  Scaled up replica set argocd-75d7f9dd68 to 1


#  kubectl get pods -n argocd
NAME                                                READY   STATUS    RESTARTS   AGE
argocd-75d7f9dd68-sx6nd                             1/1     Running   0          2m25s
argocd-application-controller-0                     1/1     Running   0          11m
argocd-applicationset-controller-5bc47fdf65-hgzh2   1/1     Running   0          11m
argocd-dex-server-6986964bf4-cccnd                  1/1     Running   0          11m
argocd-notifications-controller-66cfbcffb4-876zx    1/1     Running   0          11m
argocd-redis-6c9fc7786f-26677                       1/1     Running   0          11m
argocd-repo-server-5cdd485c97-v5j4r                 1/1     Running   0          11m
argocd-server-6c75b5678b-r59dq                      1/1     Running   0          11m

 kubectl get pods -n argocd
NAME                                                READY   STATUS    RESTARTS   AGE
argocd-application-controller-0                     1/1     Running   0          81s
argocd-applicationset-controller-5bc47fdf65-z8qzq   1/1     Running   0          81s
argocd-dex-server-6986964bf4-ntw8h                  1/1     Running   0          81s
argocd-notifications-controller-66cfbcffb4-gsqk6    1/1     Running   0          81s
argocd-redis-6c9fc7786f-s6h44                       1/1     Running   0          81s
argocd-repo-server-5cdd485c97-5mjxb                 1/1     Running   0          81s
argocd-server-f9f9478b8-24q8r                       1/1     Running   0          80s

#kubectl get svc argocd-server -n argocd
NAME            TYPE       CLUSTER-IP      EXTERNAL-IP   PORT(S)                      AGE
argocd-server   NodePort   10.111.224.66   <none>        80:30080/TCP,443:30443/TCP   12m
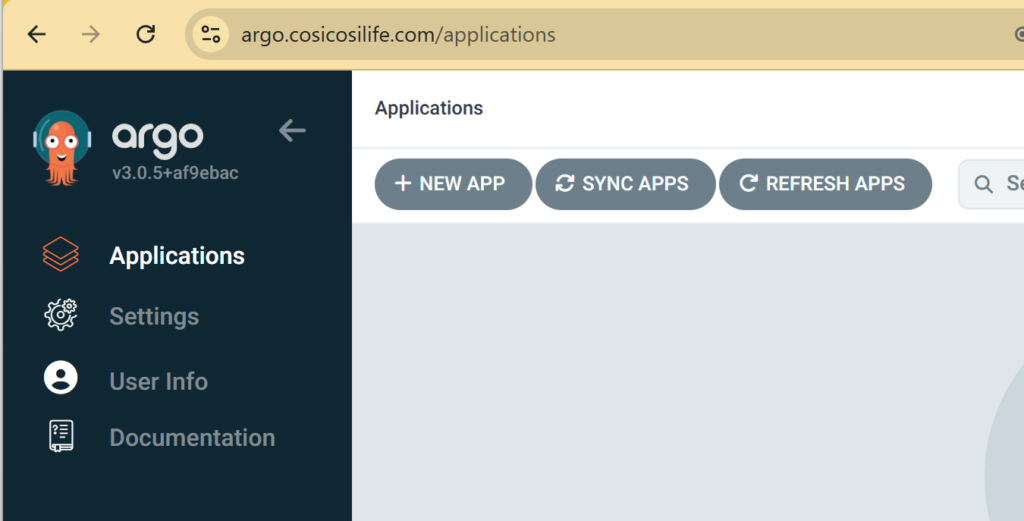
nodeport で80:30080 でサービスが動いていますね。証明書などの設定は、オンプレのnginx に任せますので、30080 をargo.cosicosilife.com に紐づけてnginx の設定を行います。
オンプレのnginx の設定
その前にcertbot でargo.cosicosilife.com 向けの証明書を取得します。その証明書をオンプレのnginxの設定に適用します
certbot --nginx -d argo.cosicosilife.com

この打鍵の結果証明書と、キーがインストールされますので下記のnginx の設定に組み込みます
オンプレのnginxではargo.cosicosilife.com でアクセスしたらk8s のノードを向くように設定します
server {
    server_name argo.cosicosilife.com;

    listen 443 ssl; # managed by Certbot
    ssl_certificate  /etc/letsencrypt/live/argo.cosicosilife.com/fullchain.pem; # managed by Certbot
    ssl_certificate_key  /etc/letsencrypt/live/argo.cosicosilife.com/privkey.pem; # managed by Certbot
    include /etc/letsencrypt/options-ssl-nginx.conf; # managed by Certbot
    ssl_dhparam /etc/letsencrypt/ssl-dhparams.pem; # managed by Certbot
location / {
        proxy_pass http://192.168.2.6:30080;
    #ここはlocalhostではなくnodeのあどれすなので192.168.2.6(オンプレのサーバのアドレスとなります)
        proxy_set_header Host $host;
        proxy_set_header X-Real-IP $remote_addr;
        proxy_set_header X-Forwarded-For $proxy_add_x_forwarded_for;
          # ここを http にすることでアプリが「HTTPS じゃない」と判断してリダイレクトを止める
    proxy_set_header X-Forwarded-Proto https;
        }
}
6. Argo CD初期パスワードの取得
管理者ユーザ名は admin です。
kubectl -n argocd get secret argocd-initial-admin-secret -o jsonpath="{.data.password}" | base64 -drd}" | base64 -d
上記のコマンドで出力されたパスワードとadmin でログインできます

