AWS Step Functionsは、複数のAWSサービスやアプリケーションを組み合わせてワークフローを構築・管理できるサーバーレスサービスです。ビジュアルツールであるWorkflow Studioを使用することで、コードの記述を最小限に抑え、直感的にワークフローを設計できます。
AWS Step Functionsの概要
AWS Step Functionsを利用すると、複雑なビジネスプロセスやデータ処理パイプラインを視覚的に設計し、自動化できます。各ステップ(状態)を定義し、それらをシーケンシャルまたは並列に組み合わせることで、柔軟なワークフローを構築できます。
ユースケース
AWS Step Functionsは、さまざまなシナリオで活用されています。例えば、クレジットカード申請のプロセスでは、以下のようなワークフローを構築できます。
- 与信チェック:申請者の信用情報を確認し、基準を満たしていれば次のステップへ進み、不十分な場合は人間による追加審査を行います。
- IDおよび住所確認:与信チェックを通過した申請者の身分証明書と住所を確認します。
- カード発行:すべての確認が完了したら、クレジットカードを発行します。
このようなプロセスをAWS Step Functionsで実装することで、各ステップの状態管理やエラーハンドリングを効率的に行えます。
エラーハンドリングの実装例
ワークフロー内でエラーが発生した場合、適切なエラーハンドリングが重要です。以下に、AWS Step Functionsでのエラーハンドリングの構成例を紹介します。
1. タスクごとにCatchを実装する
各タスクステートにCatchフィールドを追加し、エラー発生時の処理を定義します。これにより、タスクごとに異なるエラーハンドリングを実装できますが、ワークフローが複雑になる可能性があります。
2. Parallelステートでタスクをグループ化する
Parallelステートを使用して、複数のタスクを1つのグループとしてまとめ、共通のエラーハンドリングを適用できます。これにより、ワークフローの構造をシンプルに保ちながら、統一的なエラーハンドリングが可能です。
3. ワークフローのネスト
サブワークフロー(子ワークフロー)を作成し、メインワークフロー(親ワークフロー)から呼び出すことで、特定の処理をモジュール化できます。親ワークフローでエラーハンドリングを実装することで、再利用性と保守性が向上します。
これらの方法を組み合わせることで、要件に応じた柔軟なエラーハンドリングを実現できます。
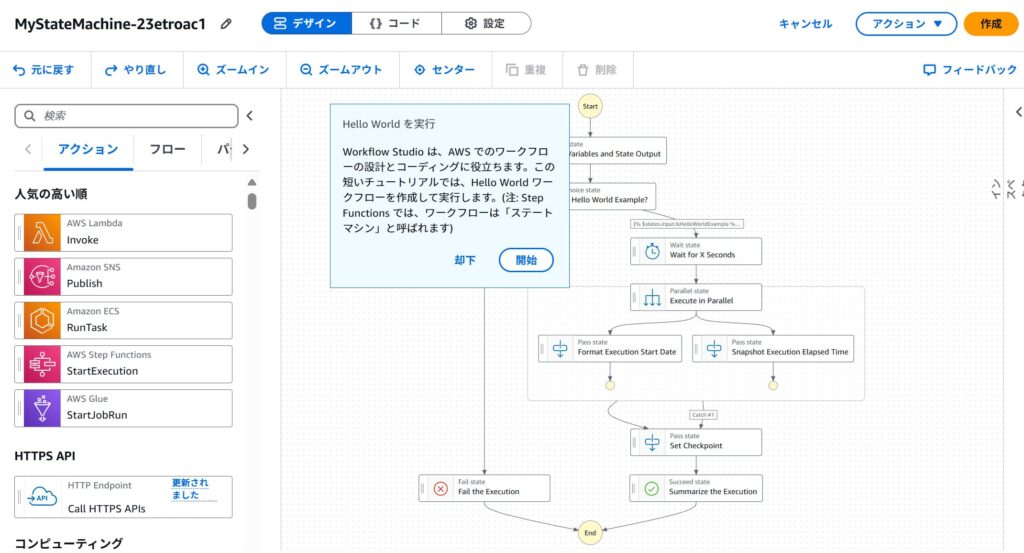
今回はHelloWorld を使ってみましょう。
今頭ぐ始めるをクリック
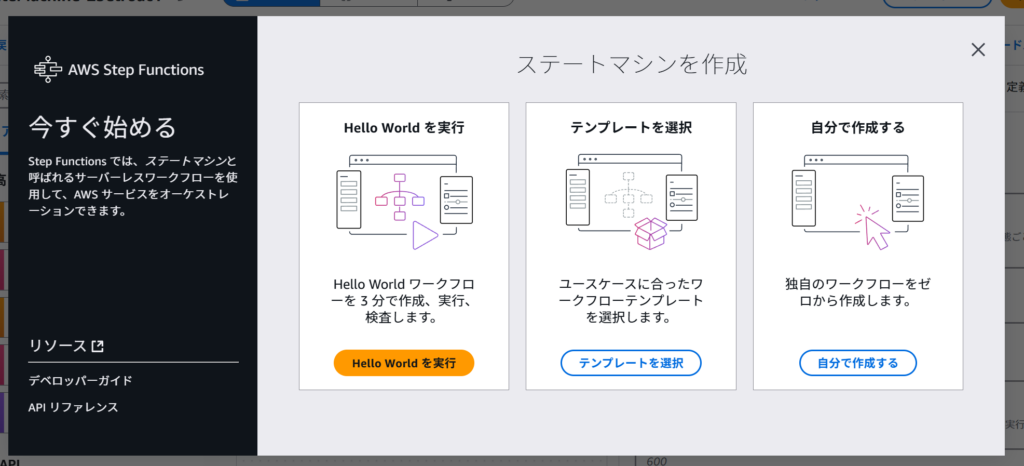
Hello World を実行
Hello World のワークフロー概要
今回紹介する Hello World のワークフローは、基本的なフロー制御ステートを含んでいます。具体的には以下のような流れになります。
- 変数の設定 (Pass ステート)
- 条件分岐 (Choice ステート)
- 待機 (Wait ステート)
- 並列実行 (Parallel ステート)
- チェックポイントの更新 (Pass ステート)
- 実行結果の要約 (Succeed ステート)
すでにテンプレートはできています
コードビューにすると下記のようになります
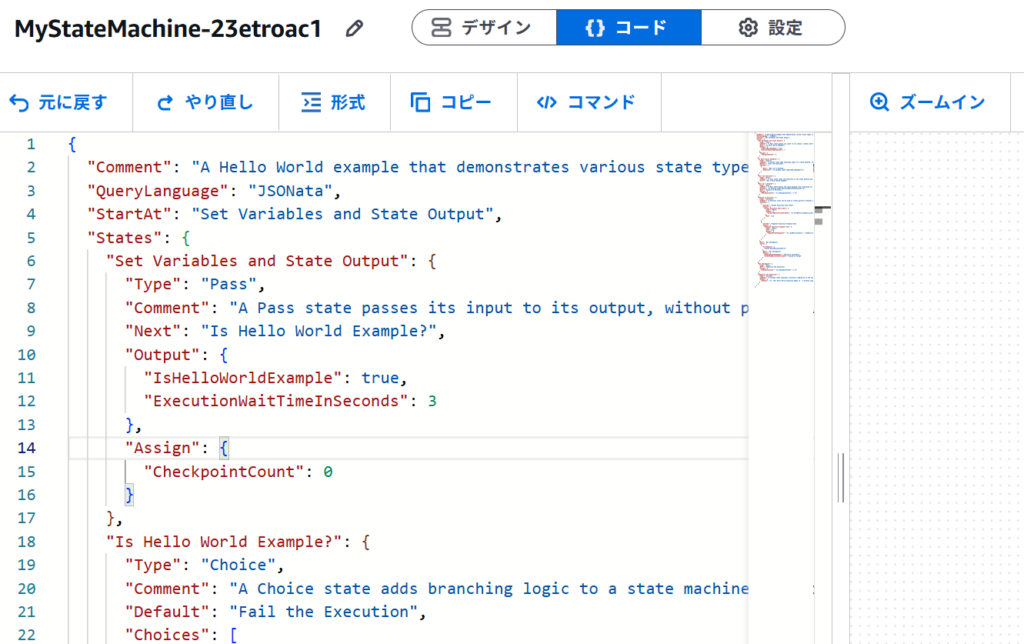
コードに説明を加えてみました
{
  "Comment": "この Step Function は、Amazon States Language のさまざまな状態タイプを示し、データの流れや JSONata を使った変換を紹介するサンプルです。",
  "QueryLanguage": "JSONata",
  "StartAt": "Set Variables and State Output",
  "States": {
    "Set Variables and State Output": {
      "Type": "Pass",
      "Comment": "Pass ステートは、データを変更せずに次のステートに渡すか、静的な JSON を生成できます。このステートでは、いくつかの変数を初期化しています。",
      "Next": "Is Hello World Example?",
      "Output": {
        "IsHelloWorldExample": true,  // "Hello World" の例かどうかのフラグ
        "ExecutionWaitTimeInSeconds": 3  // 待機時間(秒)
      },
      "Assign": {
        "CheckpointCount": 0  // チェックポイントのカウント(初期値 0)
      }
    },
    "Is Hello World Example?": {
      "Type": "Choice",
      "Comment": "Choice ステートは条件分岐を行う。JSONata を使って条件を評価し、異なるステートへ進む。",
      "Default": "Fail the Execution",  // デフォルトの処理(条件に一致しない場合)
      "Choices": [
        {
          "Next": "Wait for X Seconds",
          "Condition": "{% $states.input.IsHelloWorldExample %}"  // "IsHelloWorldExample" が true の場合
        }
      ]
    },
    "Fail the Execution": {
      "Type": "Fail",
      "Comment": "Fail ステートは処理を失敗として終了させる。",
      "Error": "Not a Hello World Example"
    },
    "Wait for X Seconds": {
      "Type": "Wait",
      "Comment": "Wait ステートは一定時間待機する。ここでは JSONata で指定した秒数(ExecutionWaitTimeInSeconds)待つ。",
      "Seconds": "{% $states.input.ExecutionWaitTimeInSeconds %}",
      "Next": "Execute in Parallel",
      "Assign": {
        "CheckpointCount": "{% $CheckpointCount + 1 %}"  // チェックポイントカウントを +1
      }
    },
    "Execute in Parallel": {
      "Type": "Parallel",
      "Comment": "Parallel ステートを使い、複数の処理を並列実行する。",
      "Branches": [
        {
          "StartAt": "Format Execution Start Date",
          "States": {
            "Format Execution Start Date": {
              "Type": "Pass",
              "Output": {
                "FormattedExecutionStartDate": "{% $fromMillis($toMillis($states.context.State.EnteredTime), '[M01]/[D01]') %}"
              },
              "End": true
            }
          }
        },
        {
          "StartAt": "Snapshot Execution Elapsed Time",
          "States": {
            "Snapshot Execution Elapsed Time": {
              "Type": "Pass",
              "End": true,
              "Output": {
                "ElapsedTimeToSnapshot": "{% ($toMillis($now()) - $toMillis($states.context.Execution.StartTime)) / 1000 %}"
              }
            }
          }
        }
      ],
      "Next": "Set Checkpoint",
      "Catch": [
        {
          "ErrorEquals": [
            "States.QueryEvaluationError"
          ],
          "Next": "Set Checkpoint",
          "Output": {
            "ElapsedTimeToSnapshot": "Failed to calculate",
            "FormattedExecutionStartDate": "Failed to format"
          }
        }
      ]
    },
    "Set Checkpoint": {
      "Type": "Pass",
      "Next": "Summarize the Execution",
      "Assign": {
        "CheckpointCount": "{% $CheckpointCount + 1 %}"  // チェックポイントカウントを +1
      }
    },
    "Summarize the Execution": {
      "Type": "Succeed",
      "Comment": "Succeed ステートは、ステートマシンの成功終了を示す。",
      "Output": {
        "Summary": "{% 'This Hello World execution began on ' & $states.input.FormattedExecutionStartDate & '. The state machine ran for ' & $states.input.ElapsedTimeToSnapshot & ' seconds before the snapshot was taken, passing through ' & $CheckpointCount & ' checkpoints, and has successfully completed.' %}"
      }
    }
  }
}
解説
このステートマシンの流れを簡単に説明すると:
- “Set Variables and State Output”
- 変数
IsHelloWorldExample(フラグ)とExecutionWaitTimeInSeconds(待機時間)を設定する。 CheckpointCount(チェックポイントカウント)を 0 に初期化。
- 変数
- “Is Hello World Example?”
IsHelloWorldExampleがtrueなら"Wait for X Seconds"へ進む。- そうでなければ
"Fail the Execution"に進み、エラーを返して処理を終了する。
- “Wait for X Seconds”
- 設定された秒数だけ処理を一時停止する。
CheckpointCountを 1 増やす。
- “Execute in Parallel”
- 2 つの並列処理を実行:
- 日付のフォーマット (
Format Execution Start Date) - 経過時間の計算 (
Snapshot Execution Elapsed Time)
- 日付のフォーマット (
- もし
States.QueryEvaluationErrorが発生した場合は"Set Checkpoint"に進む。
- 2 つの並列処理を実行:
- “Set Checkpoint”
CheckpointCountを 1 増やす。
- “Summarize the Execution”
- 成功メッセージを生成し、ステートマシンを正常終了 (
Succeed) させる。
- 成功メッセージを生成し、ステートマシンを正常終了 (
ポイント
- Pass ステート: データを変えずに渡す、またはデフォルト値を設定する。
- Choice ステート: 条件分岐を実装。
- Wait ステート: 指定時間だけ待機。
- Parallel ステート: 並列処理を実行。
- Fail/Succeed ステート: それぞれエラー終了、成功終了。
それでは一つ一つ見ていきましょう
1. 変数の設定 (Set Variables and State Output)
ステートの種類: Pass ステート
役割:
- 入力データをそのまま次のステートに渡す
- JSON データを加工する
- デバッグ時のプレースホルダーとして利用可能
"Set Variables and State Output": {
  "Type": "Pass",
  "Next": "Is Hello World Example?",
  "Output": {
    "IsHelloWorldExample": true,
    "ExecutionWaitTimeInSeconds": 3
  },
  "Assign": {
    "CheckpointCount": 0
  }
}ここでは、IsHelloWorldExample を true に設定し、ワークフローが Hello World の実行であることを示しています。また、ExecutionWaitTimeInSeconds を 3 に設定して、後で Wait ステートで使用します。
2. 条件分岐 (Is Hello World Example?)
ステートの種類: Choice ステート
役割:
- JSON データの特定の値をチェックして、実行パスを変更する
"Is Hello World Example?": {
  "Type": "Choice",
  "Default": "Fail the Execution",
  "Choices": [
    {
      "Next": "Wait for X Seconds",
      "Condition": "{% $states.input.IsHelloWorldExample %}"
    }
  ]
}このステートでは、IsHelloWorldExample が true であれば Wait for X Seconds に進み、そうでなければ Fail the Execution に進みます。
3. 待機 (Wait for X Seconds)
ステートの種類: Wait ステート
役割:
- 一定時間ワークフローの実行を停止する
"Wait for X Seconds": {
  "Type": "Wait",
  "Seconds": "{% $states.input.ExecutionWaitTimeInSeconds %}",
  "Next": "Execute in Parallel",
  "Assign": {
    "CheckpointCount": "{% $CheckpointCount + 1 %}"
  }
}
この Wait ステートは ExecutionWaitTimeInSeconds の値 (3秒) だけ待機します。
4. 並列実行 (Execute in Parallel)
ステートの種類: Parallel ステート
役割:
- 複数の処理を同時に実行する
"Execute in Parallel": {
  "Type": "Parallel",
  "Branches": [
    {
      "StartAt": "Format Execution Start Date",
      "States": {
        "Format Execution Start Date": {
          "Type": "Pass",
          "Output": {
            "FormattedExecutionStartDate": "{% $fromMillis($toMillis($states.context.State.EnteredTime), '[M01]/[D01]') %}"
          },
          "End": true
        }
      }
    },
    {
      "StartAt": "Snapshot Execution Elapsed Time",
      "States": {
        "Snapshot Execution Elapsed Time": {
          "Type": "Pass",
          "End": true,
          "Output": {
            "ElapsedTimeToSnapshot": "{% ($toMillis($now()) - $toMillis($states.context.Execution.StartTime)) / 1000 %}"
          }
        }
      }
    }
  ],
  "Next": "Set Checkpoint"
}
ここでは、
Format Execution Start Date: 実行開始日をフォーマットSnapshot Execution Elapsed Time: 実行開始からの経過時間を記録
の 2 つの処理を並列実行しています。
5. チェックポイントの更新 (Set Checkpoint)
ステートの種類: Pass ステート
"Set Checkpoint": {
  "Type": "Pass",
  "Next": "Summarize the Execution",
  "Assign": {
    "CheckpointCount": "{% $CheckpointCount + 1 %}"
  }
}
このステートでは CheckpointCount を 1 つ増やして次のステートへ進みます。
6. 実行結果の要約 (Summarize the Execution)
ステートの種類: Succeed ステート
"Summarize the Execution": {
  "Type": "Succeed",
  "Output": {
    "Summary": "{% 'This Hello World execution began on ' & $states.input.FormattedExecutionStartDate & '. The state machine ran for ' & $states.input.ElapsedTimeToSnapshot & ' seconds before the snapshot was taken, passing through ' & $CheckpointCount & ' checkpoints, and has successfully completed.' %}"
  }
}
このステートは、ワークフローの成功を示し、実行の概要を出力します。
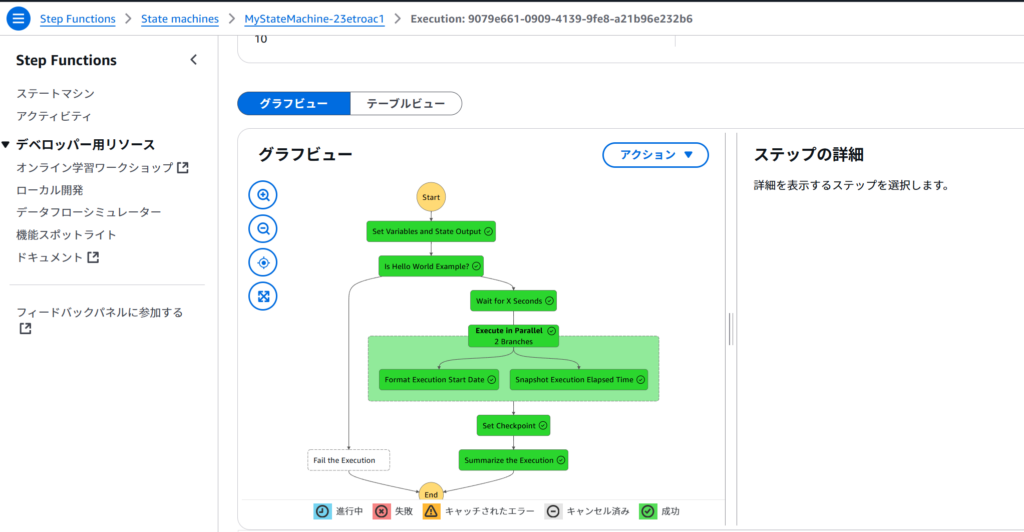
実行してみよう
作成をクックすれば始まります
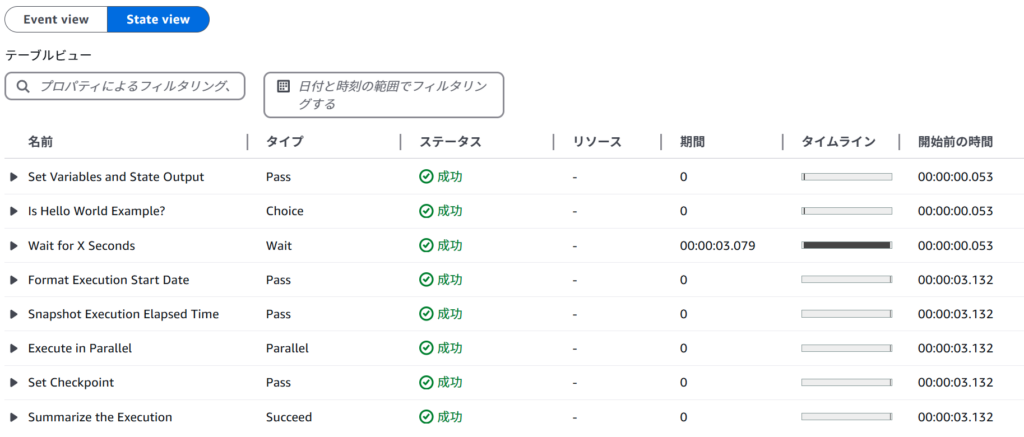
すぐに完了します。グラフビューは下記のようになります。
ステートビューでは下記のようになります

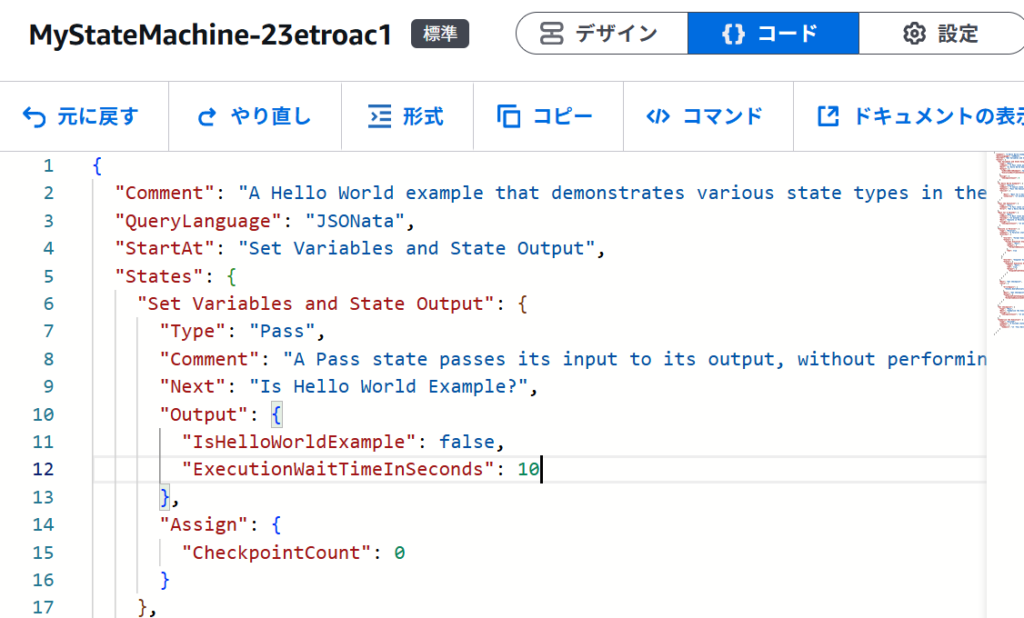
それでは,ステートのコードを falseにすればどうなるでしょうか?上記のコードの部分を書き換えてみましょう
"IsHelloWorldExample": false, // "Hello World" の例かどうかのフラグ
コードブロックで編集する際には、下記のようになります
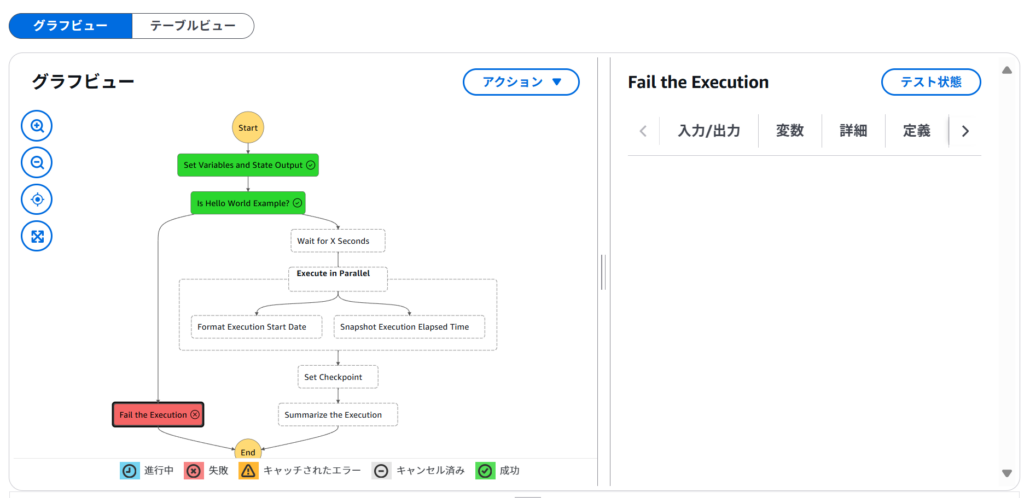
当然のごとく実行すると下記のように失敗します
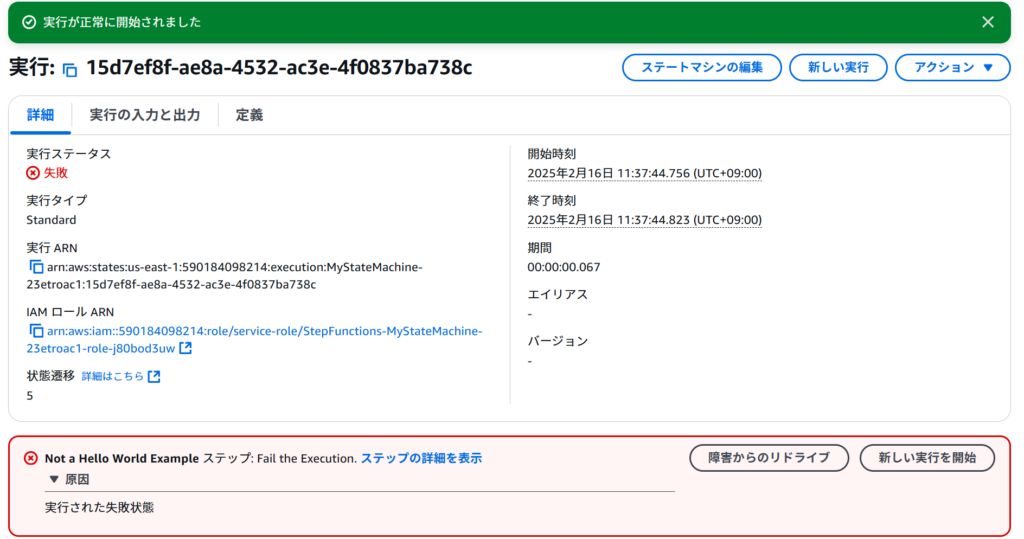
グラフビューで見てみても失敗しています